Rokeby Museum
Rokeby Museum Distance Drawing Course — Week 3: Mistakes
WEEK 1 | WEEK 2 | WEEK 3 | WEEK 4 | WEEK 5 | WEEK 6
Inspired by Rachael Robinson Elmer (1878–1919) and taught by Courtney Clinton, Rokeby Artist in Residence
Dear Student,
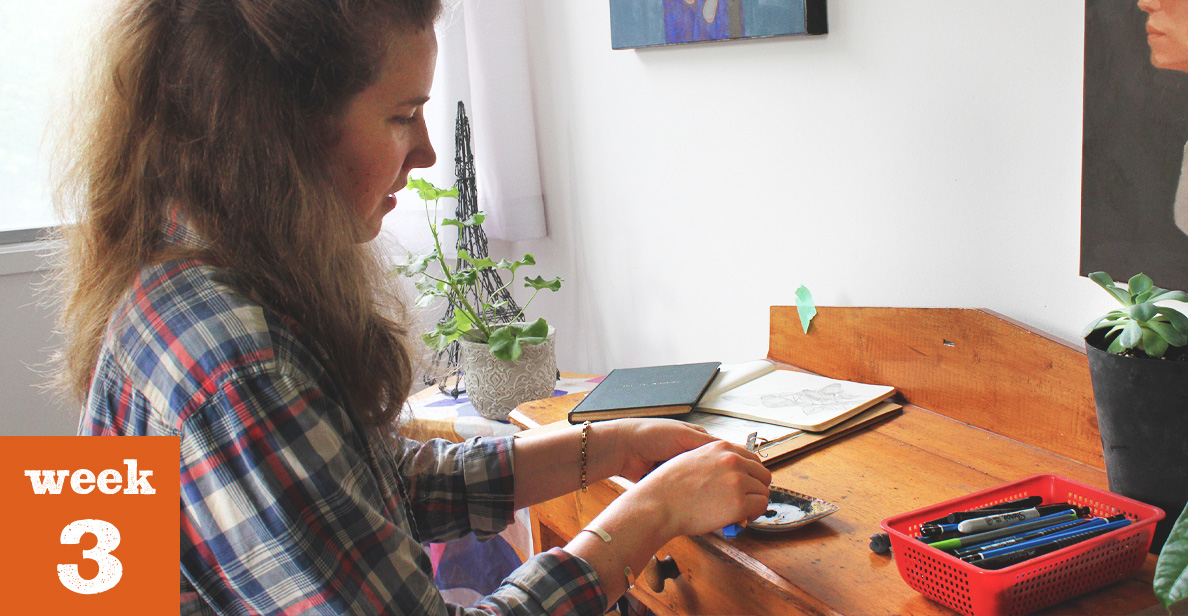
Courtney Clinton, Rokeby Artist in Residence here. For the past couple months, I have been exploring the Rokeby Museum collection with Allison Gregory, Education and Interpretation Fellow. The project centres around the letters from a 19th century correspondence drawing course that former Rokeby resident, Rachael Robinson Elmer (1878–1919), took as a young teenager. Each week we share part of Rachael’s story and a drawing lesson!
Part of our mission with this project is to share a historic perspective on the contemporary issue of remote learning. While the letter format of Rachael’s course may seem different to the current Zoom model, this 19th century example is packed with relevant insights for parents and educators navigating remote learning during the pandemic.
A major challenge to remote educators is giving mindful student assessments. In a classroom, teachers can gauge a student’s reaction. In a distance scenario, the student has to take on and manage their response to criticism. So how do we better prepare students to take on feedback?
In this week’s post, we consider criticism from the perspective of the student. Learning to engage with feedback is a central step in the learning process. It forces us to ask new questions and look at our work from a new perspective. Once we get over our emotional response, knowing what is not working becomes a point of departure and can get us closer to our learning objectives.
This week’s drawing exercise is actually based on a drawing critique Rachael received during her studies. Through Rachael’s example, I hope to reframe criticism in a more positive light.
Exploring the Museum’s Collection
From 1891 to 1893 Rachael studied illustration with a New York artist named Ernest Knaufft (1864–1942) through the Chautauqua Society of Fine Art. The course cost $5 dollars a year and offered instruction in freehand drawing and the pen and ink technique used for book and magazine illustration at the time — with today’s inflation that’s still a bargain at $150.
Prior to the 1890s, newspapers and magazines used wood engraving to imprint illustrations; this technique was very expensive and faded away once the cheaper technology of photo-engraving was in vogue. This new technology allowed printers to reproduce drawings made in pen and ink, opening up the field to freelance artists not attached to an engraving firm. Today, many consider illustration work a kind of creative accent in print media, but in the 1890s, illustration was the central mode of visual expression. Illustrators depicted current events, such as the election of a new congressman or a local sporting event (Knaufft 1889, 83-86 and Knaufft 1890, 119-120).
The Chautauqua Movement was founded by Reverend John H Vincent and Lewis Miller in 1876. Through distance learning, they made education accessible to hundreds of thousands of Americans living in remote communities (Scott 1999, 389-412).
In 1887, Ernest became the Director of the art department. Born in Summit, NJ, in 1864, he studied art at the prestigious Art Students League. After his studies, he went on to teach at Princeton University (1886-1889) and Purdue University (circa 1900). Ernest was also well known as an art critic. In 1892 he started his own monthly publication, The Art Student. Like the Chautauqua Movement, the magazine’s mission was to make art education accessible to students unable to study in one of the major art centres.
Drawing Course Letters
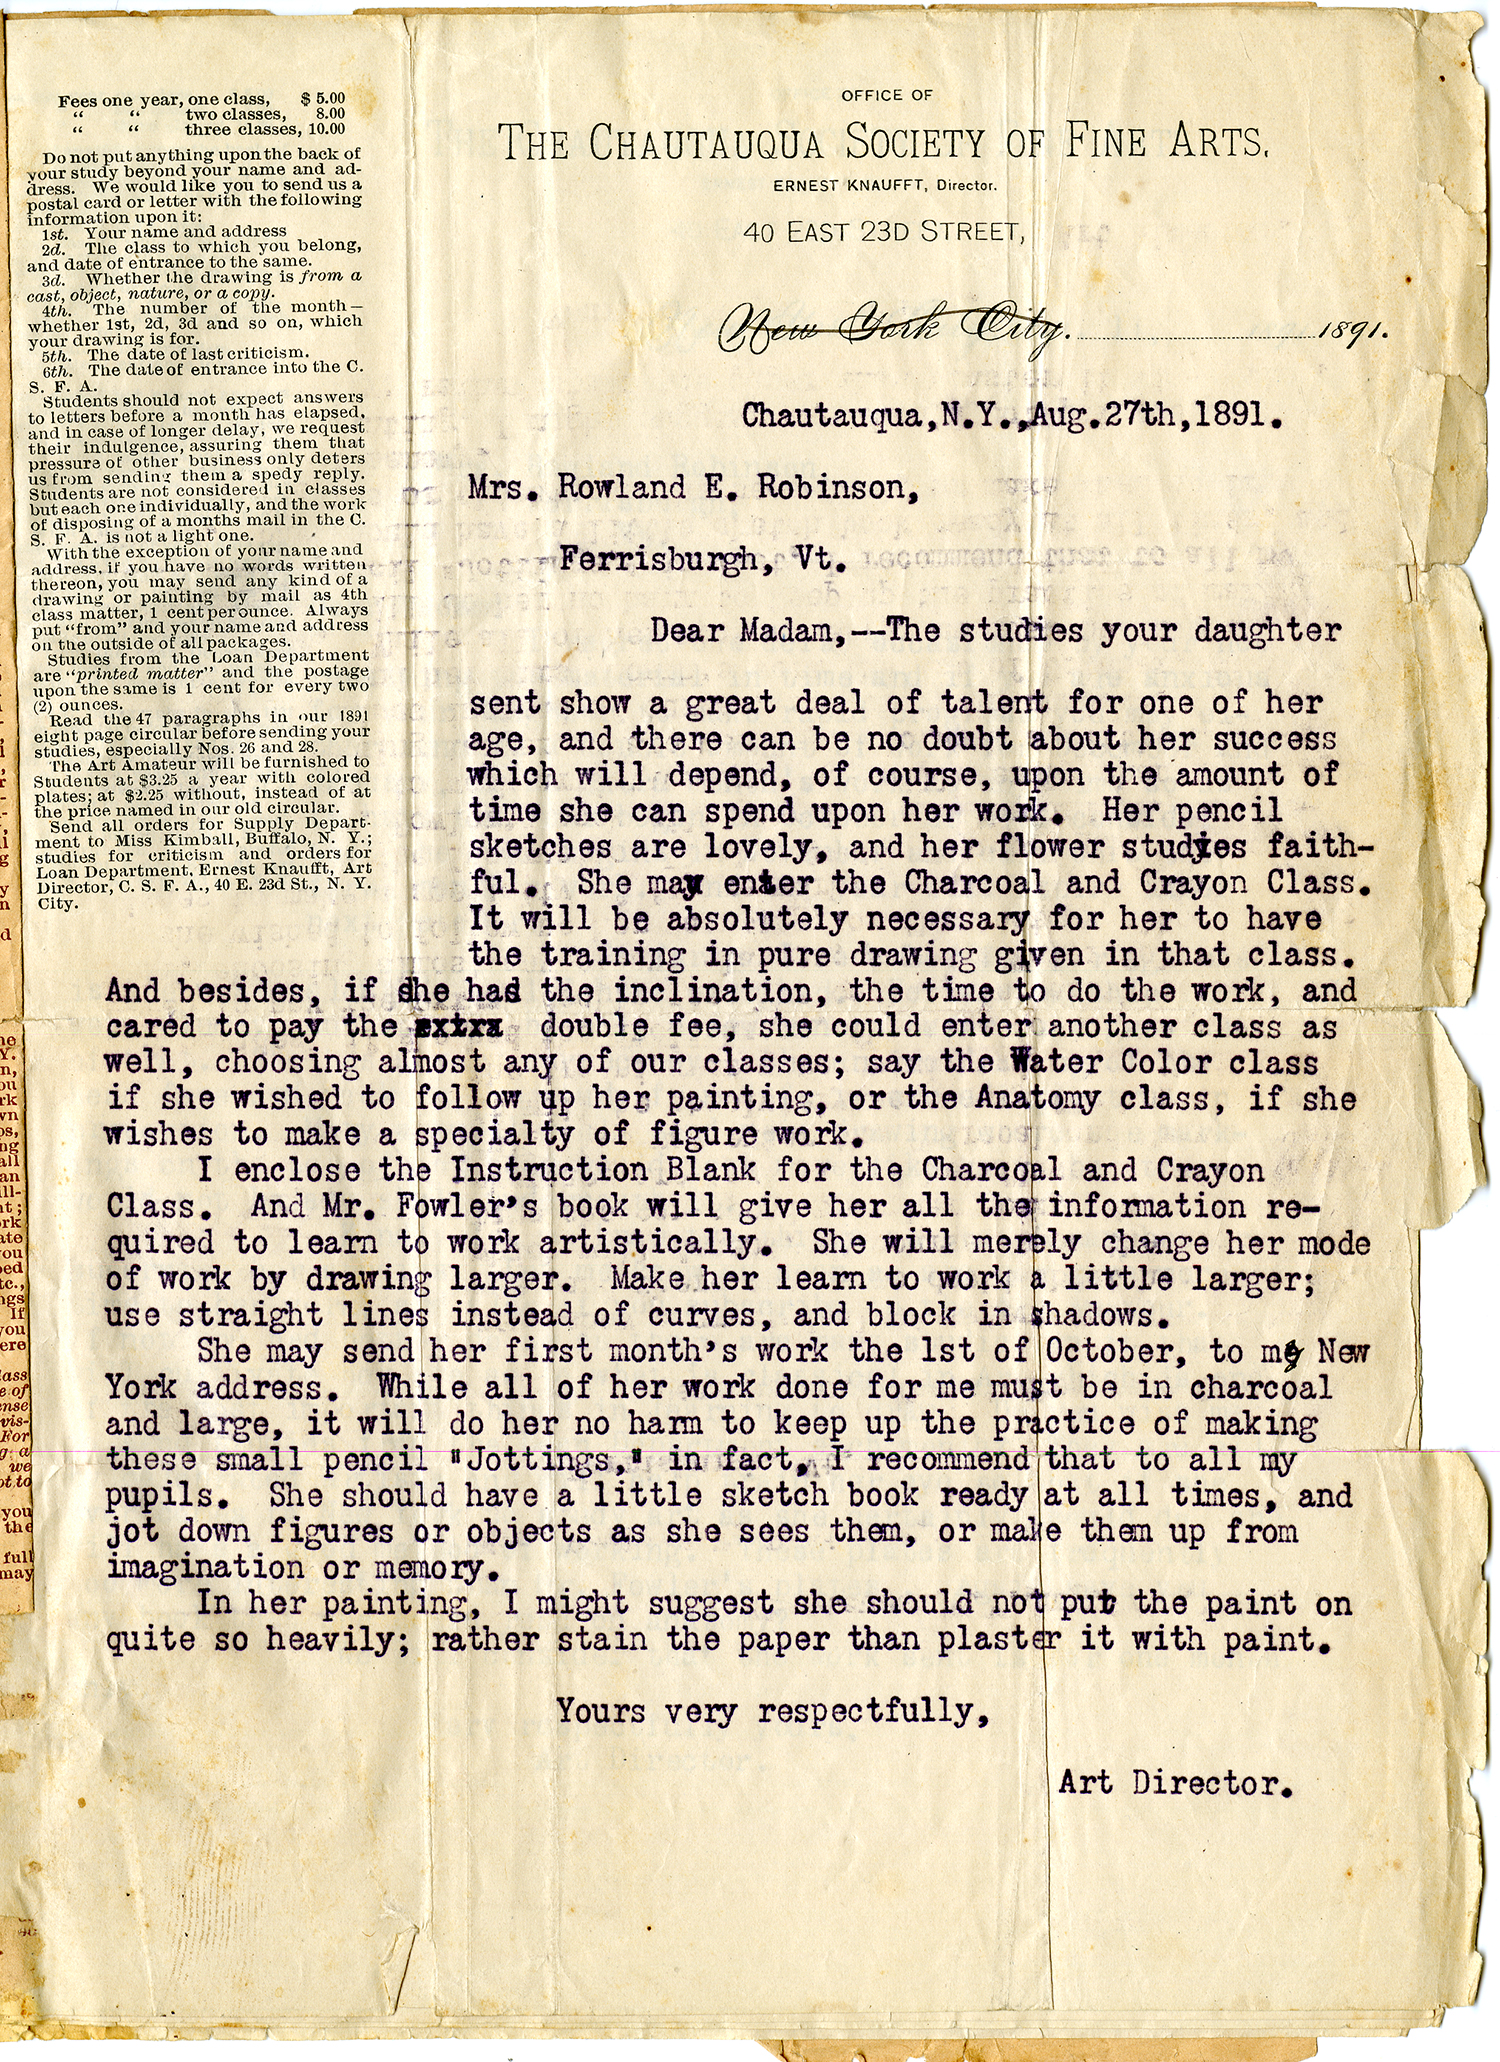
Every month, Rachael would send a collection of drawings to her teacher’s New York studio. In return, he would send back her drawings with corrections and a written explanation.
It’s never easy to get feedback and Ernest’s teaching style was direct (to say the least).
Ernest: The cast drawing is not good…
— Ernest Knaufft to Rachael Robinson Elmer, April 9, 1892
Gulp!
Ernest: … You must try again and see if you cannot get the effect without using the stomp so much and not having so many lights and darks around the features as you have
— Ernest Knaufft to Rachael Robinson Elmer, April 9, 1892
From the letters, we know that Rachael often struggled with the disappointment that comes with being told you’ve made a mistake. Recognizing his tone may have been a bit too severe, Ernest later wrote to apologise to Rachael.
Ernest: I am sorry to learn from your mother’s letter that you have been ill and that you are discouraged about the cast
— Ernest Knaufft to Rachael Robinson Elmer, May 5, 1892
So why did Rachael stick with it? Who wants to get a letter listing out their mistakes each month? I can’t speak for Rachael, but I know from my own art education, I learned to really value this kind of tough feedback.

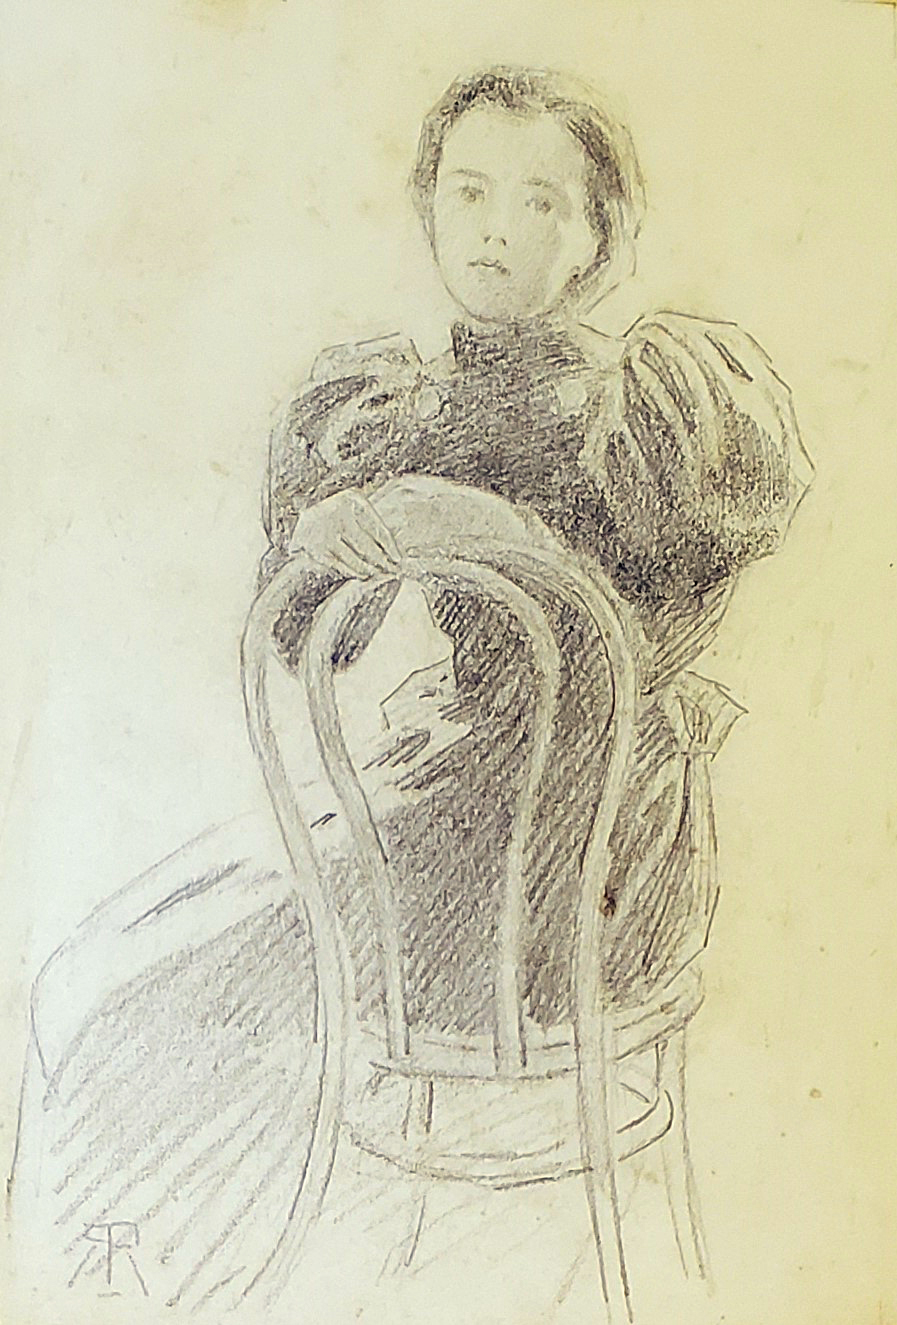
When I was first learning to draw, I used to attend a weekly portrait drawing class with the artist Oleg Dergachov, who came from the Russian Academic Tradition. Every week we would draw a portrait from a live model. Oleg would come around and check on my progress. When Oleg came to my easel, I would step to the side and hand him my pencil. Oleg would say a few kind words and then draw over my work making corrections (You can always tell a teacher’s lines because they are darker and more confident!). Over time, I realised that my teacher wasn’t trying to fault me, he was trying to show me what I couldn’t yet see.

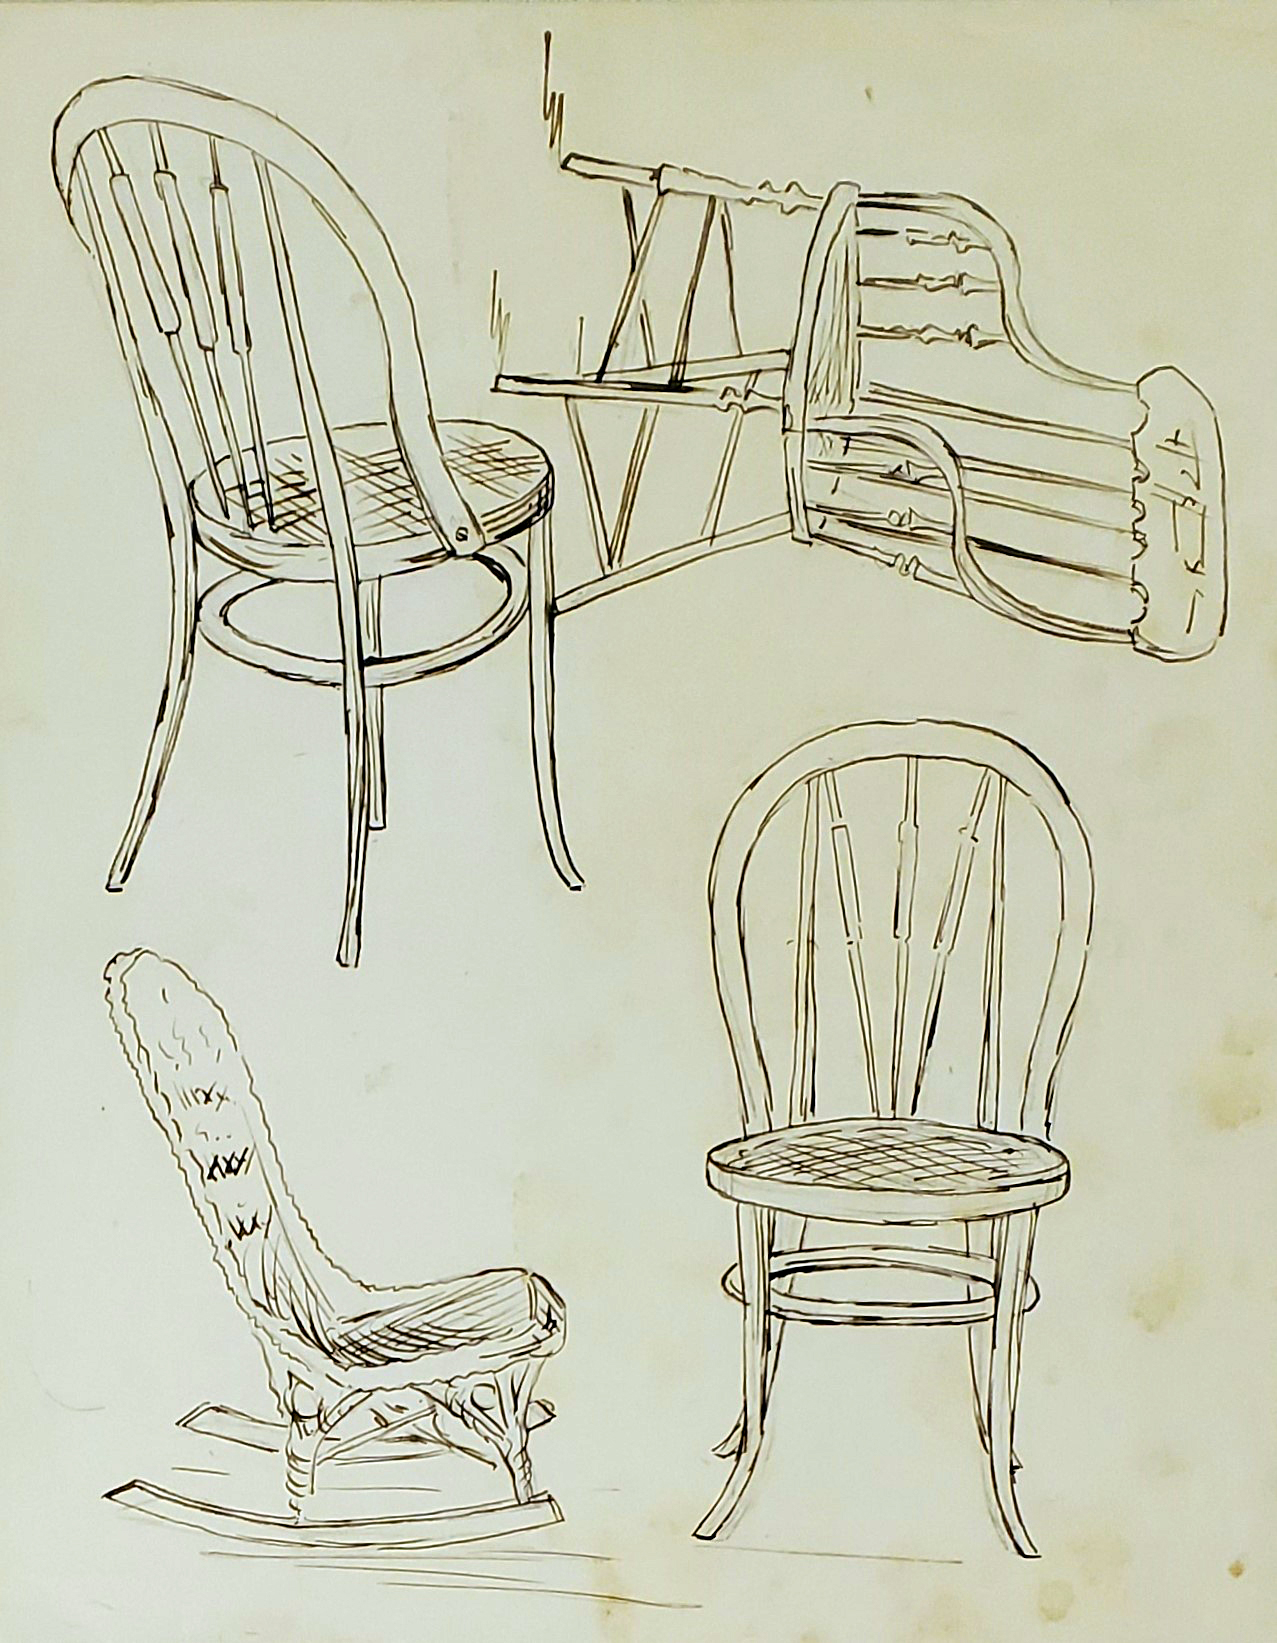
In the same way, Ernest’s critique of Rachael’s work was not a comment on her artistic intention or style. Ernest’s detailed critiques were mini lessons on art theory and a way to train his student’s eye. Just like my teacher, he would often draw diagrams on the side of the sheet to help break down and further explain topics like anatomy and structure.
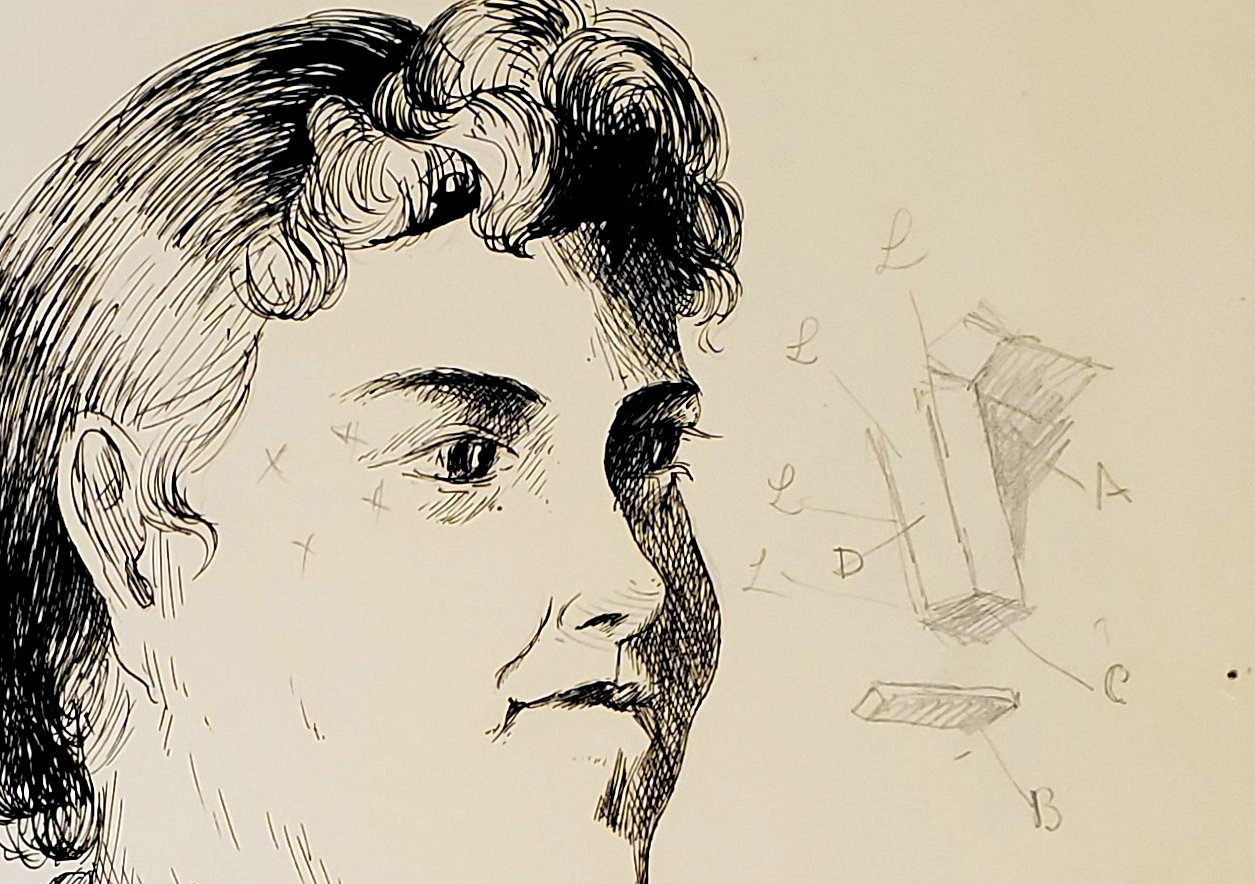
Ernest: The left eye socket is what I want, it is separated from the nose, but the under part of the nose should have been in shadow. I have drawn 2 blocks of wood in the same lighting as the nose and argued out that if there should be such a strong shadow at A and B, there needs must be a shadow at C, (the light coming from L and the plane C being at almost right angles to D) then again, the right eye is very poorly modeled, and planes at XXX are not well understood.
— Ernest Knaufft to Rachael Robinson Elmer, October 4, 1892
Drawing Exercise
In this critique, Ernest taught Rachael a key artist approach to drawing. To work out a complicated subject like the face, artists first simplify the features into more basic geometric forms. For this week’s exercise, we are going to learn this approach by drawing a chair. Because a chair is built with wooden blocks it’s a great way to learn this constructive approach.
Note: As you work your way through this exercise, share your work! Be sure to tag @clinton.courtney and @rokebymuseum on Instagram and use the hashtags #RokebyDistanceDrawing and #DrawingWithRachael. Got a question for Courtney? Let us know in the comment section below!
Setup
Chair Set Up
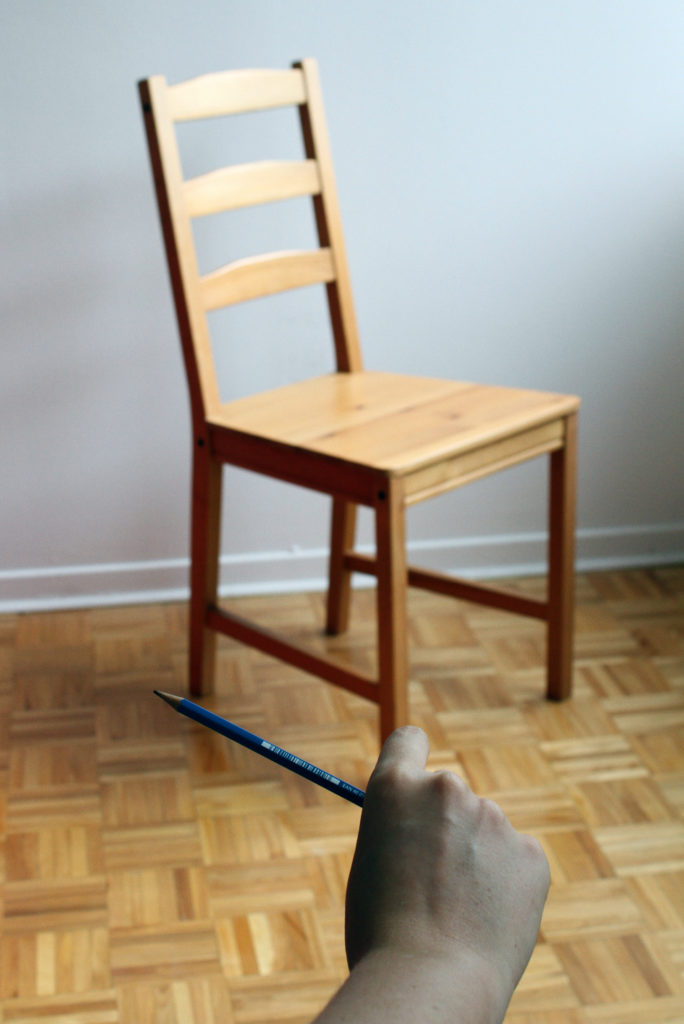
For this exercise I want you to work from life. This means you are going to draw your chair. It’s always easier to work if you have a solid backdrop behind your object. I placed my chair in front of an empty wall. Try to position your chair in the same three quarter position as mine. That way you can refer to my process images for hints if you feel lost. Set your drawing station up about 6 feet from your chair — always maintain social distancing with your chair!

Pencil and Paper
For this exercise we are going to use the same material as last week. We will use a soft pencil (2B or 6B) and a large piece of paper (at least 10 x 14 inches). Just like last week, I want you to work on a slanted surface. This means instead of drawing on a flat table, I want you to prop a big book (or an art board) against your table.
No Rulers
A chair is made up of a lot of straight lines and it can feel pretty tempting to use a ruler. They say an artist has to draw 10,000 lines to become a professional. Everytime you use a ruler you miss out on an opportunity to practice your lines!
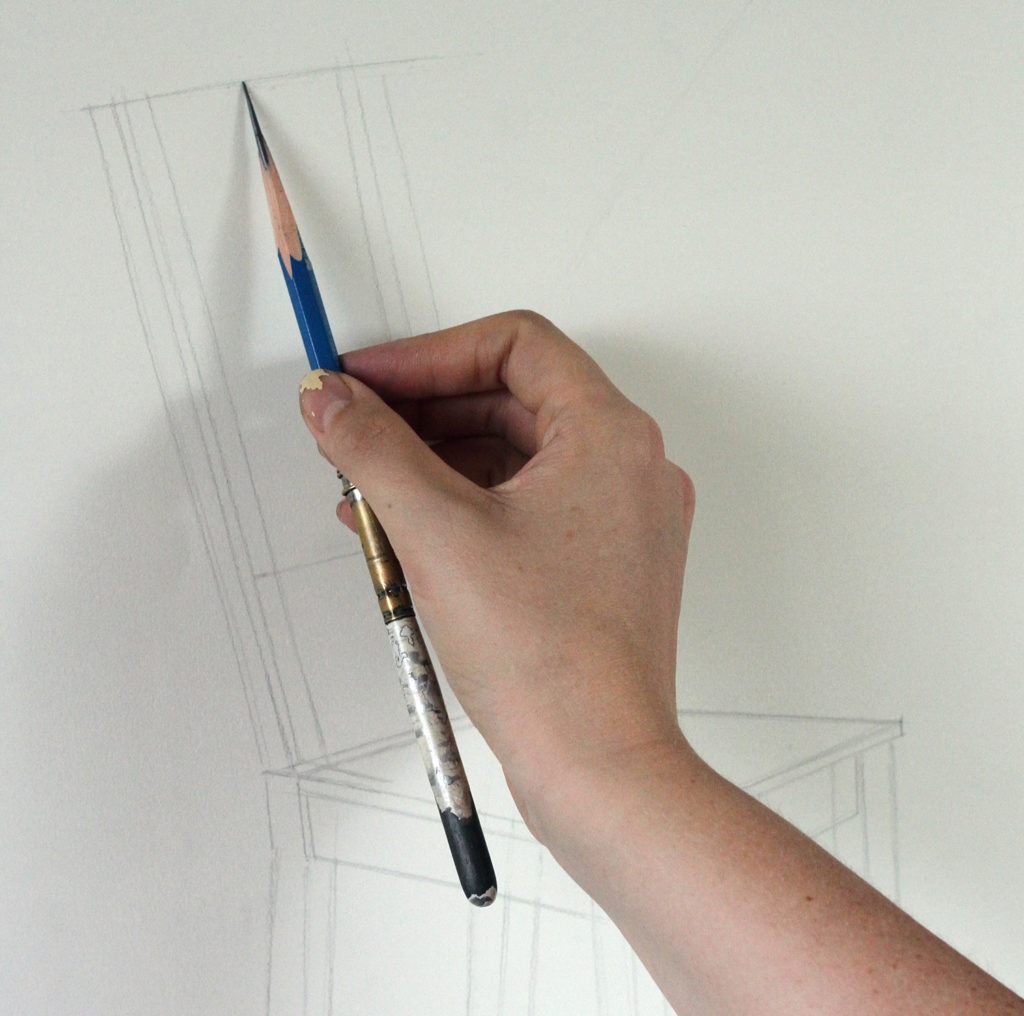
Holding your Pencil
Again I want you to practice holding your pencil like an artist. Hold the pencil in the middle on it’s side between the thumb and the index and middle fingers.
Geometric Forms
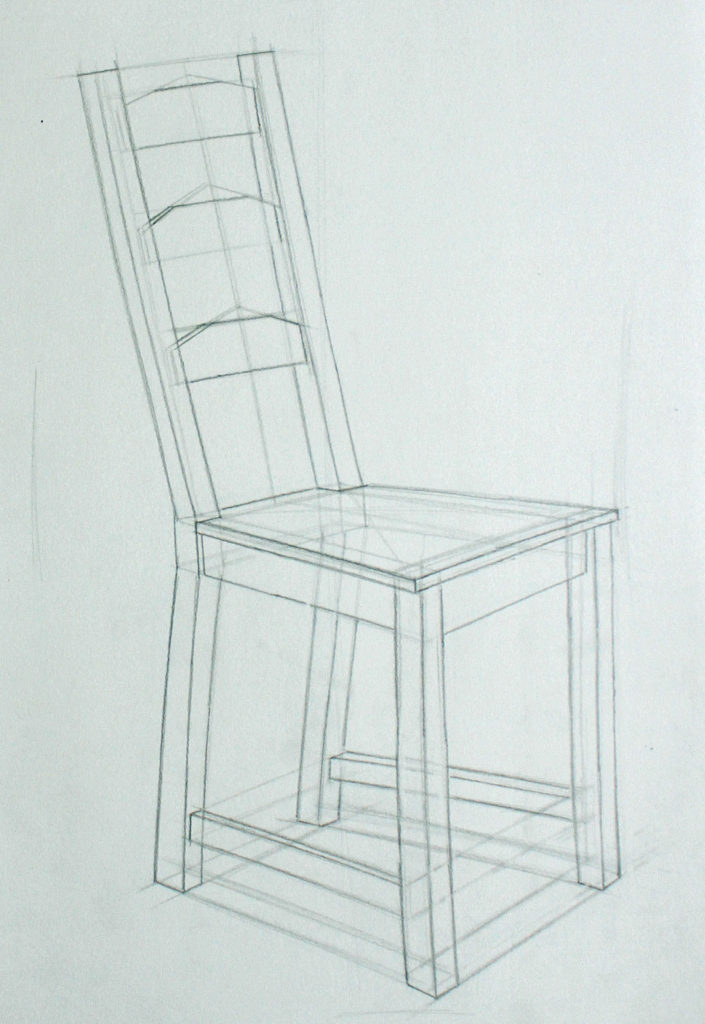
Before we start, take a moment to look at my drawing. If you look closely you will notice lots of (gasp) mistake lines. Those light grey lines hovering around the main frame of my drawing: all mistakes! Some of them are in the wrong position, some go in the wrong direction, others are just too wonky. The point is that, at this early stage, I don’t waste time erasing all of my mistakes. In fact I keep those lines because they act like guides to get my lines right.
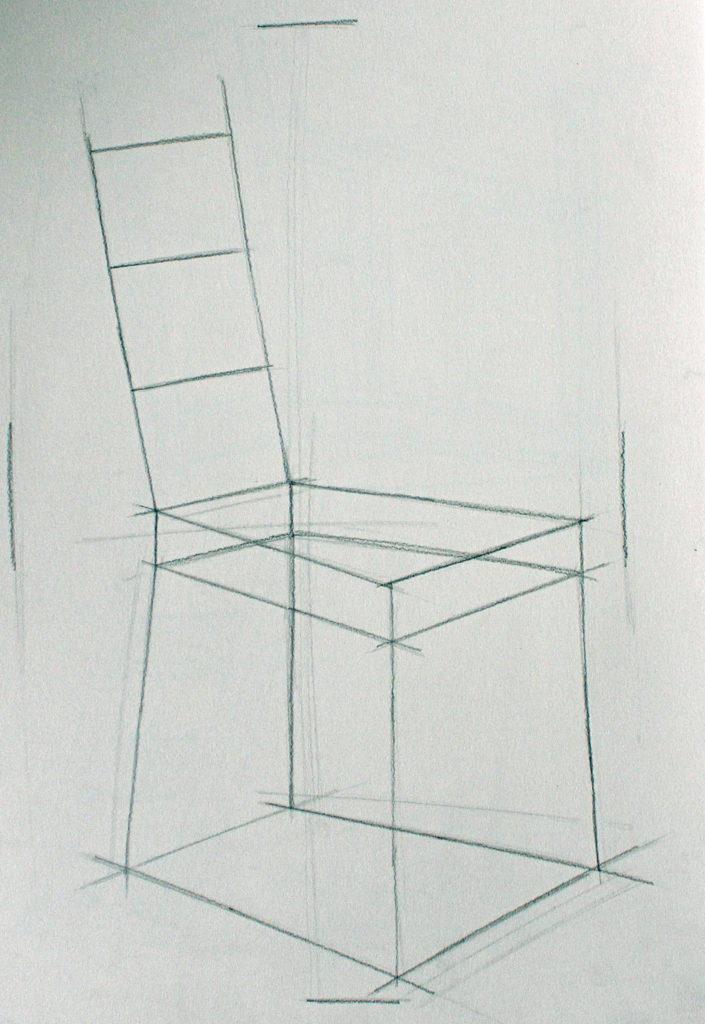
To place my chair correctly in the centre of my page, I first make a series of marks to represent the extremities of my chair. What is the lowest point on my chair (front leg)? What is the furthest left edge (top of the back of my chair)?
As I continue, I want to think like a builder. Before I break the chair into its parts, I reduce it into a series of flat boards.
The relationship between the legs of my chair is going to give my drawing a sense of perspective. Before I draw my legs I want to work out their relationship, so I imagine that they are attached to a base.
To find the sides of my base, I measure the four angles that join the legs. I can take an angle by sticking my arm out straight and lining the edge of my pencil from leg to leg.
Before I start adding detail, I want to spend some time thinking about the relationship between my legs. Let’s consider the two legs in the middle of my picture (the front left and back right legs). How much space is between those two legs? How long is the back leg compared to the front?
If I ask these questions now it’s really easy for me to make corrections, because my legs are literally a series of straight lines. The further I get in my drawing, the more work it is to make these changes. Keeping my drawing simple in the beginning allows me to move things around until I get them just right.
Building Blocks
In this next step, I am going to build out my legs. The temptation is to go around and draw one leg at a time. A better way to approach the legs is to treat them like a unit. To help, I draw another box inside my original base. This smaller box is going to act like a path and help me define the inner side of each leg.
As I build up my chair, I work transparently. Look at the seat of my chair. In reality I can’t see the base of the seat. But in my drawing I show my base to help me get the right perspective and join my seat to the legs and chair back.
Adding Detail
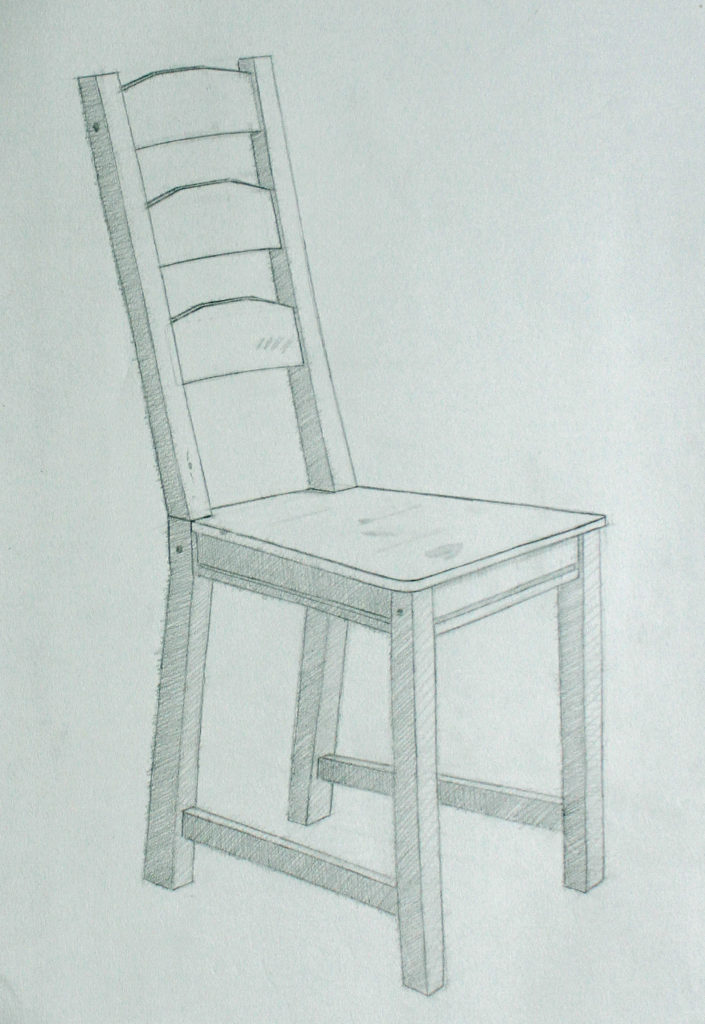
Now that I have worked out the structure of the chair I can start to add detail. In the first two stages we don’t care too much about the quality of our lines. These initial lines are like guides.
Now that I am happy with the placement, I can go over these guides with darker and more careful line work. I work nice and slowly as I make these final lines. I look for small details like the curved corners of the top of the seat. These little details will give my drawing a sense of authenticity.
Perspective
Drawing a chair from life is harder than it looks. If this is your first time, you might be feeling a bit discouraged — don’t worry we have all been there. In a future lesson, I will share a series of strategies to self-correct your art. But at this stage, try drawing the same chair from a new position.
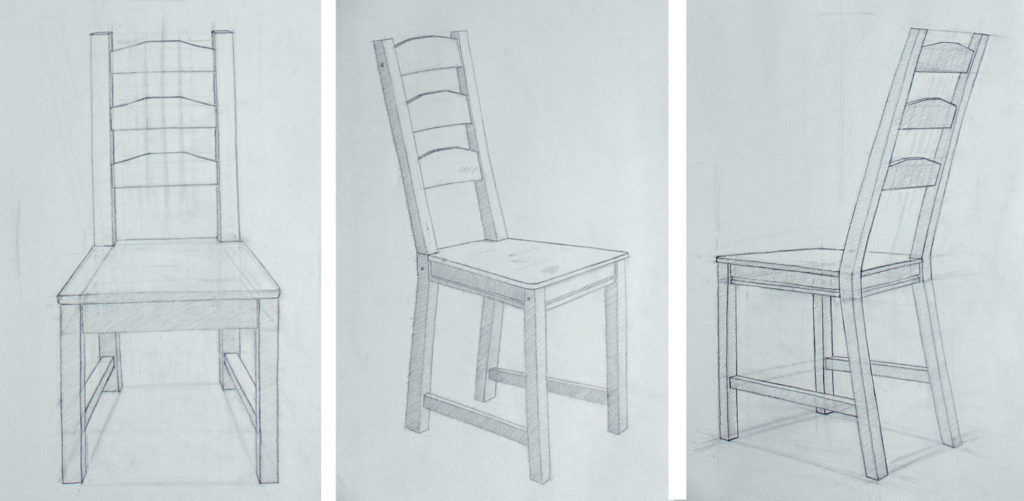
What does the chair look like from up close (image 1) as opposed to across the room (image 2)? How does its appearance change if you place it on a table (image 3)? With each new drawing, pay special attention to the position of the chair legs and the depth of the seat.
By accurately describing the position of the legs and the proportions of that top side, we can communicate an idea about the placement of our object in space. Pretty cool!
Signing Off
While Ernest could be tough on Rachael, he wrote letters to her mother Ann Stevens Robinson (1841–1920) praising her daughter’s talent.
Ernest: So far as I remember for her age she is the most talented pupil I have ever had
— Ernest Knaufft to Ann Stevens Robinson, November 11, 1891
To the uninitiated, Ernest’s detailed criticism can be read as severe (and maybe even mean), but what he was doing was actually incredibly generous. This former university professor and renowned art critic saw talent in Rachael and treated her like a serious artist (signing off each letter “Very Respectfully Yours”).
When someone criticizes your art, it can feel like a personal attack. But more often than not a detailed critique of an artists work is actually a compliment. Learning to accept criticism means changing how you think about your mistakes. Instead of thinking about your mistakes as a moment of failure, I encourage you to see them as unanswered questions. And remember the answer is out there, it may just take a few more drawings!
Very Respectfully Yours,
Courtney Clinton
Rokeby Museum is excited to offer this 6-part series from artist in residence Courtney Clinton. Please consider a donation, if you can, to help us continue to offer programs like this.
We acknowledge the support of the Canada Council for the Arts.